Let every man be master of his time.
Designing boomerangs
Throwing away a stick which comes back is great. Making such a stick, is even better. However, puzzling out the shape that makes the stick come back the way you want it, always held the greatest fascination for me.
While a lot of literature exists on how to throw, and how to build a boomerang (see the wikipedia references for that), information on designing, or modifying your own boomerangs is extremely scarce. Partially, this is probably due to the impossibility to predict the flight of a boomerang from its shape, a fact that also lead me to sticking to the shapes outlined in my books. At some point, however, I started playing around with some leftover pieces of different materials, like lightwood and plexiglas (bad idea by the way, hard to smoothen and nearly invisible when homing in on you from the right angle), and also with shapes that would make nice presents. And, as it turns out, pretty much any shape could be made to come back, when following a few design principles.
Designing shapes


Optimizing a boomerang's flight
Admittedly, if you take just any shape for a boomerang, and even when you give it the right profile, the boomerang not always does what you want it to do. It might fly but come back too fast to catch, it might just tumble, or it might be too slippery to through strong enough. Here are some solutions to that.
Using holes

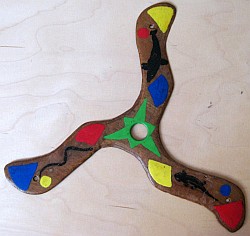
The easiest way to modify a boomerang is drilling some holes into it. This not only makes them much easier to put up on a wall, but gives you control about the way the boomerang flies.
A hole means increased air friction at the part of the boomerang. So, a hole close to a boomerang's center of mass slows a boomerang down. Furthermore, one or multiple holes further out from the center (i.e. on the wings), slow down mainly the boomerang's rotation. So, if your boomerang comes back at extremely high speeds and wildly rotating, a hole in the wings will get you a more tame boomerang. If the boomerang flies multiple circles when you throw it, a hole in the middle will slow it down, but retain its rotation, so it will not get further than the first round before losing speed.
I found that drilling a small or large hole changes the boomerangs behaviour only little. In general, however, if you make holes too large, boomerangs tend to break easily. Further, I found that, apart from its distance to the center of mass, the position of a hole has only tiny effects on the way a boomerang flies. Therefore, wherever possible, I recommend not to use large holes, but rather multiple small ones that are spread out over the wings.
Using weights

Holes have the obvious disadvantage that once you drilled one, it is hard to get rid of it. If you do not want to slow your boomerang down (which is what I normally want to make it fly in a large circle), weights are a versatile, and easy-to-test solution.
Below, I will describe in more detail, how a weight in a given position on the boomerang affects a its path in the air. First, however, I present a few ways to put such weights on a boomerang, so you can choose which technique you like to use on your own boomerang.
Types of weights
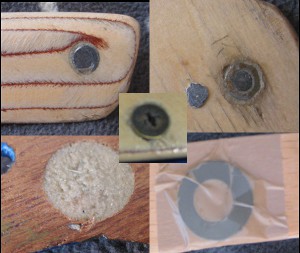
The best way for testing is to tape metal parts, such as washers, to the boomerang surface. One may not always have washers in various weights lying around, but coins work very well, and allow to stitch together pretty much any weight you might need. When taping, I recommend to use tape with a smooth surface to minimize changes to the boomerangs aerodynamics.
Once the right weights are found using the tape-on method, one can go for a more durable long-term solution. The easiest, version is to drill a hole from the back of the boomerang, but stopping about 2mm from the from surface (for instance, using a drill-guide). Then one can take a screw of the right diameter, saw it to the right length and screw it into that hole.
If you need heavier weights, or if your boomerang is pretty thin, one can use a large drill on the back of the boomerang to make a cavity. Filling this cavity with putty, or hammering lead (from the angler's shop) into it, normally gives a nice and relatively smooth surface that often looks nice, too.
If you want to go even heavier, then drill all the way through the boomerang. But putting putty or lead into the hole alone, the boomerang tends to lose the weights during flights. However, what works really well for me is the following procedure. First, hammer a screw's nut that is slightly larger than the hole diameter into the hole. Fill its interior with lead, and put putty wherever there is a gap around the nut. After this is dry, take a steel rasp to get smooth surfaces on the front and the back of the boomerang
Where to put weights
Under construction
